Honing your skills in hardening steel at home can be both gratifying and practical. Whether you're working on a large-scale project or just looking to sharpen your tools, mastering this skill can be transformative. While it might seem daunting at first, especially if you’re new to metalworking, with a bit of knowledge and access to some basic tools, you can achieve impressive results without needing top-tier equipment or years of practice.
As the UK’s trusted provider of stainless, mild, and galvanized steel, Clickmetal is here to assist you in perfecting the art of steel hardening. Follow our step-by-step instructions on heating, quenching, and tempering, and watch your steel transform into something strong and resilient, ready for your next endeavor!
Why Harden Steel?
Steel hardening is a technique designed to enhance the material’s strength and durability. This makes it ideal for crafting tools such as knives, chisels, or other items requiring a robust edge. By carefully managing the heating, quenching, and tempering phases, you can strike the perfect balance between hardness and toughness, avoiding the pitfalls of brittleness that can come with over-hardening.
Stay Safe!
Given the high temperatures involved in the hardening process, it’s crucial to prioritize safety to safeguard yourself and your environment. Here are some vital safety tips to keep in mind:
- Always wear heat-resistant gloves and goggles to protect your hands and eyes.
- Ensure your workspace is well-ventilated, particularly if you plan to use oil for quenching, to avoid inhaling harmful fumes.
- Keep flammable materials at a safe distance from your work area.
- Have a fire extinguisher close by as a precautionary measure.
- Remember that steel retains heat longer than it appears, so handle quenched pieces cautiously to avoid burns.
What You’ll Need
You don’t need expensive or specialized equipment to harden steel at home. Here’s a list of essential tools to have on hand:
- A piece of steel: Stainless, carbon, or mild steel works best.
- A heat source: A propane blowtorch or forge for controlled heating.
- A quenching medium: Water or oil, depending on the type of steel.
- Tongs or pliers: For safely handling the hot steel.
- A sturdy container: To hold your quenching medium.
- An oven (for tempering): To finish the process and reduce brittleness.
- Safety equipment: Heat-resistant gloves, goggles, and protective clothing.
Let’s Get Started
Step 1: Choose the Right Steel
The initial step is selecting the appropriate type of steel for your project. High-carbon steel is an excellent choice due to its carbon content, which responds well to heat treatment. Other types of steel can also work, but high-carbon steel is often recommended. If you’re unsure which steel is best suited for your project, feel free to reach out to Clickmetal for expert advice.
Once you’ve chosen your steel, ensure it’s clean by removing any rust or debris from the surface. Impurities can interfere with the hardening process, so thorough cleaning is essential.
Step 2: Heat the Steel
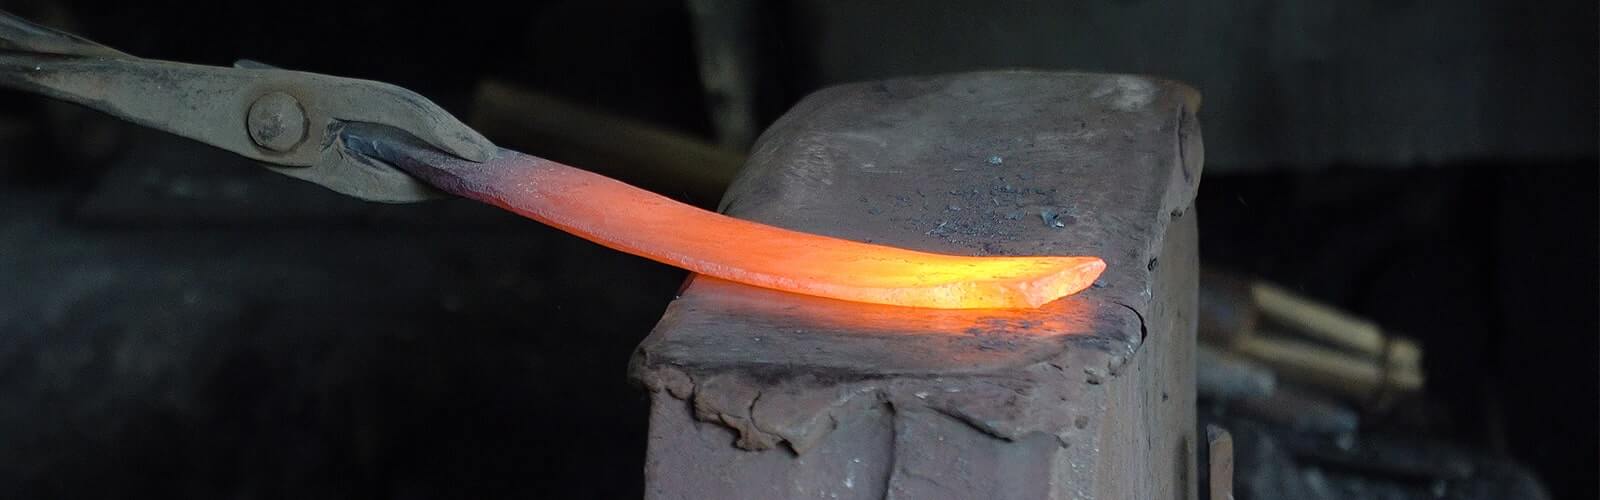
The next step is heating the steel to its “critical temperature,†typically between 800°C and 900°C (a bright red glow). You can achieve this using a blowtorch or a small forge. Keep the steel in the flame until it heats evenly and glows red-hot. For beginners, it’s advisable to practice on a scrap piece of metal to familiarize yourself with the process.
If you’re using a forge, ensure you move the torch or rotate the steel to ensure uniform heating. One easy way to check if it’s ready for quenching is by using a magnet. When the steel reaches its critical temperature, it will lose its magnetic properties, indicating it’s ready for the next stage.
Step 3: Quench the Steel
Once the steel reaches the correct temperature, it’s time to cool it quickly through quenching to lock in the hardness. The quenching medium depends on the type of steel you’re working with—water or oil. Mild and carbon steels generally respond well to water, whereas certain alloys may require oil. Always quench the steel vertically to prevent warping, and ensure the container is deep enough for complete submersion.
- Water Quenching: Fully submerge the steel in water and cool it rapidly. This ensures effective hardening.
- Oil Quenching: Better suited for more brittle steels, oil cools the metal slightly slower than water, reducing the risk of cracking. However, be cautious—oil can ignite, so always wear protective gear and use a fire-safe container.
Step 4: Tempering the Steel
At this point, your steel will be extremely hard but also quite brittle. To counteract this brittleness while maintaining hardness, tempering is essential. This involves reheating the steel to a lower temperature (usually between 150°C and 350°C) and allowing it to cool gradually.
- Preheat your oven to the desired tempering temperature.
- Place the steel in the oven for about an hour, enabling the heat to alleviate some of the internal stresses from the quenching process.
- After tempering, allow the steel to cool naturally to room temperature.
The precise temperature and duration for tempering depend on the type of steel and the balance you wish to achieve between hardness and toughness. Higher temperatures result in a tougher steel but one that is less hard, while lower temperatures preserve hardness but may make the steel less flexible.
After tempering, you can test the steel’s hardness by attempting to scratch it with a known hard object, such as a file. If the steel resists scratching, you’ve successfully hardened it!
Explore Premium Steel Components at Clickmetal
Hardened steel opens up countless opportunities for your DIY projects, enabling you to craft durable tools, components, or decorative pieces. With the right techniques and safety measures, hardening steel at home becomes an achievable and rewarding endeavor.
If you require high-quality steel for your next project, Clickmetal offers custom-cut stainless, mild, and galvanized steel, delivered straight to your door. We aim to process all orders within 3-5 working days, and once ready, they’re shipped via a next-day courier.
Whether you’re a hobbyist or a professional, our extensive range of metals and expert support can help you find precisely what you need. Browse our full selection of metals and kickstart your next project today!
Rotary Rings are a type of rotating seal widely used in various rotating equipment, such as rotary joints, rotary couplings, rotary connectors, etc. Its main function is to prevent liquid or gas leakage and maintain the normal operation of the equipment. In different applications, the material, structure, sealing method, size, etc. of Rotary Rings vary to adapt to different working conditions.
The materials of Rotary Rings are mainly divided into two categories: metallic and non-metallic.
Metal materials mainly include stainless steel, steel, copper, aluminum, etc., which have characteristics of high strength, corrosion resistance, wear resistance, and are suitable for rotary seals in harsh environments such as high temperature, high pressure, and high-speed.
Non metallic materials mainly include ceramics, silicon carbide, graphite, etc., which have characteristics such as high hardness, high wear resistance, and low friction coefficient. They are suitable for rotary seals under conditions such as low temperature, low pressure, and high speed.
The structure of Rotary Rings is mainly divided into three types: unidirectional rotation, bidirectional rotation, and rotational stationary.
1. Unidirectional rotating structure
The Rotary Rings with a unidirectional rotation structure can only rotate in one direction and are suitable for devices with only unidirectional rotation.
The Rotary Rings with a bidirectional rotation structure can rotate in two directions, suitable for devices that require bidirectional rotation.
The Rotary Rings with a rotating stationary structure are composed of a rotating ring and a stationary ring. The rotating ring contacts the stationary ring during rotation to achieve sealing, suitable for equipment that requires a rotating stationary seal.
The sealing methods of Rotary Rings are mainly divided into mechanical sealing and liquid sealing.
Mechanical sealing is achieved through the contact surface between the rotating ring and the stationary ring, which has the characteristics of high reliability, long service life, and simple maintenance. It is suitable for rotary sealing in harsh environments such as high speed, high temperature, and high pressure.
Liquid sealing is achieved by injecting liquid between the rotating ring and the stationary ring, which has the characteristics of good sealing performance, low friction coefficient, and preventing dry friction. It is suitable for rotary sealing under low speed, low temperature, low pressure, and other conditions.
The size of Rotary Rings is mainly determined by the equipment requirements, including inner diameter, outer diameter, thickness, shaft diameter, etc.
Rotary Seals,Rotary Lip Seal,Rotating Shaft Seal,V Seals
DG Zhongxingshun Sealing Products Factory , https://www.zxs-seal.com