Plastic-wood flooring is mainly made of wood (wood cellulose, plant cellulose) as the base material, thermoplastic polymer material (PE plastic) and processing aids, etc. The high-tech green materials, which combine the performance and characteristics of wood and plastics, can replace the new environmentally-friendly high-tech materials for wood and plastics.

Plastic wood floor construction matters needing attention
1. Plastic wood can use ordinary woodworking machinery to cut, saw, drill, and open ends.
2. Fix the plastic keel to the floor with an expansion tube. The expansion tube has a fixed point spacing of 500mm-600mm. The screw cap is lower than the surface of the wooden keel. The wood keel fixation needs to be relatively flat.
3. Self-tapping screws can be used between plastic wood and plastic wood, stainless steel self-tapping screws are recommended for outdoor use, and self-drilling and self-tapping screws are used for plastic wood and steel plates.
4. When using self-tapping screws between plastic wood and plastic wood, the hole should be drilled first, that is, pre-drilled. The diameter of the pre-drilled hole should be less than 3/4 of the screw diameter.
5. When installing outdoor flooring, use a screw between the wood profile and each keel.
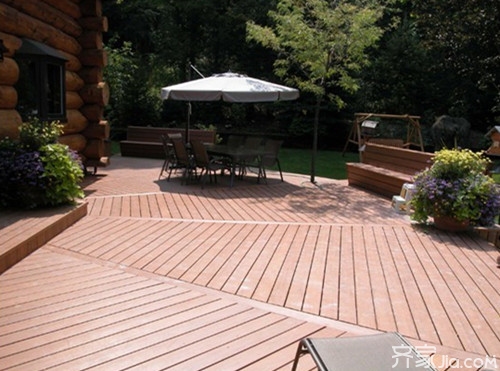
6, plastic wood floor and the keel of the junction are used plastic buckle will be fixed plastic wood flooring and keel.
Plastic wood floor installation method
1. The fixed plastic keel will evenly arrange the plastic keel and spread it on the flat concrete floor. It is recommended that the distance between each keel is 30 cm. Drill holes in the keel with an electric drill. The hole diameter should be slightly smaller than the diameter of the stainless steel screw. Screw the screw into the drilled hole to fix the keel to the concrete floor. During construction, the nail head should be fully screwed into the keel, and should not be exposed outside the keel. Otherwise, the floor layout may be uneven.
2. Fix the first floor The left and right sides of each floor have yin and yang grooves respectively. When paving the first floor, you can use the woodworking tools to saw away or grind away the positive groove on the outside of the first floor. Then drill a hole on the floor surface with an electric drill and screw in a nail to fix it on the keel. Another method is to use the company's special edge banding to catch the outer groove of the first floor of the board, and then drill holes on it with a drill, screwed into the nail. After the edge banding is installed, the floor will look like a framed frame, so using the latter method will make the finished floor surface more beautiful. It is recommended to use it. Then drill the screw in the hole on the inside of the first floor and screw in the screw to fix it to the keel.
3. Fix the second floor. Hold the second floor's male groove in the position of the first floor's female groove. Then drill the hole in the second floor's female side surface. Screw in the screw to fix it to the keel. Above, the spacing between the screws can be controlled by the construction personnel during the installation process. It need not be too dense to ensure its firmness. The method of installing the floor behind is the same as that in the case where the male groove portion on the outer side of the last board can also be treated by removing the edge or inserting the frame.
Editing summary: About the color steel sandwich panel installation and color steel sandwich panel features introduced here, and hope to be helpful to everyone. If you want to know more related information, you can pay attention to this website information.
Good Bamboo Flooring or Wood Flooring Wood Flooring Material Wood Flooring Flooring Hot Wood Flooring Wood Flooring Thickness
Face Mask Maker,Mask Making Machine Price,Mask Manufacturing Machine,Ultrasonic Folding Mask Machine
Dongguan Huitong Automatic Machinery Technology Co., Ltd , https://www.medicalmaskmachines.com