Many homeowners want to know about the bathroom waterproofing practices in home improvement, but many times are boring textual comments. There is very little bathroom waterproofing scheme. Today, Xiao Bian took everyone to look at the bathroom waterproofing practices and bathroom waterproofing practices for your reference.

Bathroom waterproofing diagram
1, brush the first time waterproof coating
Before construction, ensure that the construction site is clean and dry. The waterproof coating should be completely filled with no missing material. It should be firmly bonded to the grass roots, free of cracks, bubbles and no shedding. The brushing height is the same and the thickness must meet the product requirements.
2, brush the second time waterproof coating
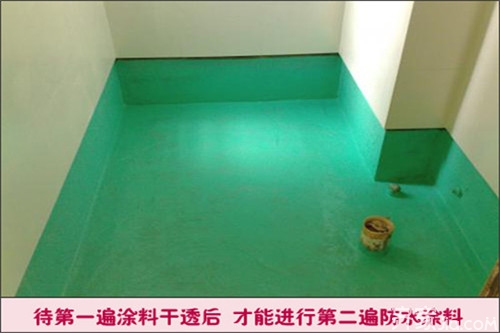
Note that there is a certain time interval between the first and second pass of the waterproof coating. After the first pass of the coating, the second pass can be performed. The specific time depends on the coating. The interval is too short and the effect of waterproofing will be greatly reduced.
3, shop protection layer

In order to prevent the subsequent construction from damaging the waterproof layer, a protective layer should be applied on the surface of the waterproof coating. The protective layer must completely cover the waterproof layer without any omission. It has a strong bond with the grass roots, no cracks, no bubbles, and no shedding.
4, closed water test
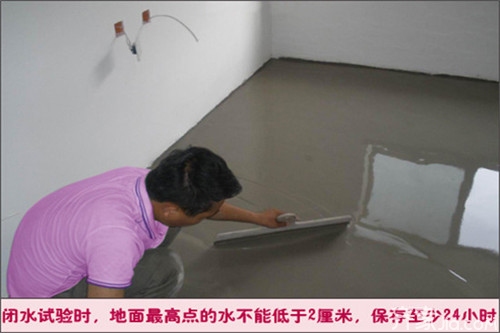
In the closed water test, the water at the highest point on the ground must not be lower than 2 cm, and it should be stored for at least 24 hours, and it should be considered as qualified after observing no leakage. If there is leakage, it needs to be redone and you must not neglect it.
Bathroom waterproof practices
1, to ensure that the bathroom floor is relatively stable
If it is necessary to change the floor tiles of the bathroom, after the original floor tiles are cut away, the ground must be leveled with cement mortar and then treated with water. This will prevent leakage of the waterproof coating due to uneven thickness.
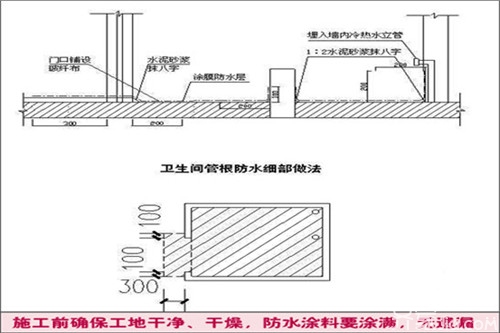
2, seams to brush in place
The seams between the bathroom wall and the seams between the upper and lower water pipes and the ground are the most prone to problems.
3, wall treatment is also very important
In the general bathroom waterproofing treatment, a waterproof coating of about 30 cm in height is also required on the wall to prevent water accumulation from passing through the wall. However, if the wall of the bathroom is a non-load-bearing light wall, the entire wall should be covered with a waterproof coating.
4, waterproof experiment must be done
After the construction of the bathroom was completed, all the water in the bathroom was blocked, and a 25 cm high “can†was built at the entrance. Then, 20 cm of water was poured into the bathroom.
5, keep the sewers open
All sewers in the bathroom, including floor drains, sanitary ware plumbing, etc., should be kept open.

Editor's summary: The related information about the bathroom waterproof practice diagram and the bathroom waterproof practice specification was introduced here for everyone. I hope this article will be helpful to everyone. If you want to know more information, you can pay attention to this website information.
Bathroom Bathroom Waterproof Toilet Waterproof Practice
SunwayRFID is a supplier & manufacturer with 8 years experience, located at Shenzhen, specialized in doing rfid cards, rfid white cards, rfid smart cards, smart cards and so on.
SuwayRFID can do fast lead time of the RFID Smart Card, 50K RFID White Card in ship in 10 days.
Rfid cards can do with all kinds LF, HF, UHF and dual frequency chip, like mfiare classic 1k, mifare classic 4k, mifare plus, mifare desfire, mifare ultralight, icodea and so on.
RFID White Card
RFID White Card,RFID Membership Card,RFID Read Write Card,RFID Smart Card
Sunway Smartech Co.,LTD , https://www.sunwayrfid.com