With the promotion of housing industrialization and the popularity of new wall materials, the use of lightweight wall panels has brought innovation to the construction industry and building materials market. As a special type of wall device, lightweight wall board saves time and effort in home decoration. Lightweight wallboard is easy to install , convenient and flexible. Lightweight wallboard can be disassembled repeatedly. Because it is made of special materials, it can be cut to any size according to our special requirements to meet our specific requirements. The light weight of the wall panels is very light, so we can save a lot of transportation costs when transporting them. Next, I will give you a brief introduction to the installation process and precautions for lightweight wallboards .
Classification of lightweight panels
Divided by section structure
1. Hollow strips (code: K) - There are several prefabricated strips running through the hollow along the length of the slab.
2. Solid strips (Code: S) - Non-porous preformed strips made from similar materials.
3, composite slats (code: F) - prefabricated panels composed of two or more different functional materials.
Divided by component type
1, ordinary board (code: PB)
2, door and window frame (code: MCB)
3, special-shaped board (code: YB)
Lightweight wallboard size
Length (L):
It is generally not more than 3.3m. It is the height of the floor minus the thickness of the structural parts at the top of the floor and the technical processing space. It can also be determined through negotiation between the supply and demand sides.
Width dimension (B):
The main specifications are 600mm, 610mm, 1200mm.
Thickness (T):
The main specifications are 80mm, 90mm, 100mm, 120mm, and there are 60, 75, 100, 150 and other specifications.
Lightweight raw materials for wallboard
1. Cement
2, fly ash
3, light aggregate, including polystyrene foam particles, foaming perlite, light ceramic, wood chips, straw and so on.
4, alkali-resistant fiber, mesh cloth
5, structural keel
6. Additives
The use of lightweight wallboards and their advantages and disadvantages
Hollow strip (code: K)
Cement is used as bonding material, industrial slag, fly ash, volcanic ash, polypropylene fiber, and foamed perlite are added materials, chemical additives are added uniformly, molds are cast to obtain products, and the cut length is determined according to the needs of the project. Then used for buildings.
Advantages: light weight, fire protection, and low cost.
Disadvantages: The connection needs to add mesh and secondary plaster.
Solid Strip (Code: S)
With cement as binder material, industrial slag, fly ash, mesh cloth, foamed polystyrene particles, etc. are added materials, chemical additives are added, and the products are molded by casting, and the length of cut is taken according to the needs of the project. Then used for buildings.
Advantages: light weight, fireproof, planable, squeaky, nailed, etc., can be directly putty decoration. Disadvantages: The connection needs to add grid cloth and secondary plastering, and the cost is higher.
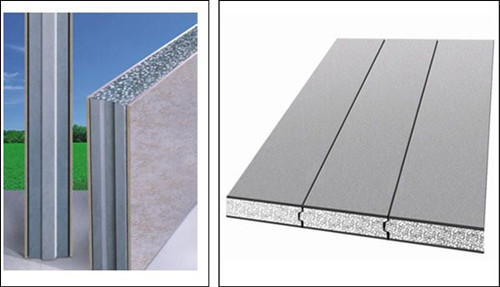
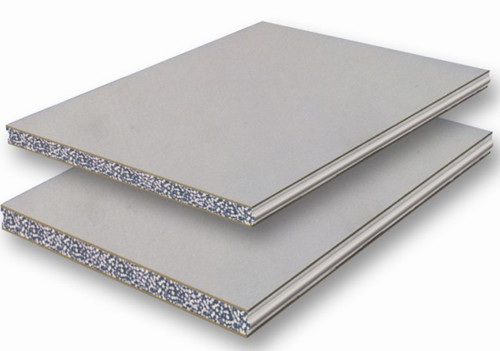
Composite Strip (Code: F) - Sandwich Composite Board
Cement is used as bonding material, industrial slag, fly ash, building waste, lightweight aggregates (foamed polystyrene particles, light ceramic particles, vitrified microspheres) as additive materials, plus chemical additives Evenly, the mold is cast to obtain the product.
Lightweight energy-saving wallboards with the structure of silicic acid cover (both sides) + flame-retardant and heat-insulating material (sandwich), and the side is a standard jaw design.
Advantages: light weight, energy saving, environmental protection, sound insulation, heat insulation, waterproof, fire prevention, heat preservation, antifreeze, shockproof, increased use area, long life, etc.; easy installation, good processing performance, sawing, planing, nailing, drilling, sticking , then, the hole is not deformed, reduce wet operation, construction, fast, no plaster, can be directly decorated.
Disadvantages: The height of the panel is limited by the panel. The general height is 2.44 meters and the width is 0.61 meters.
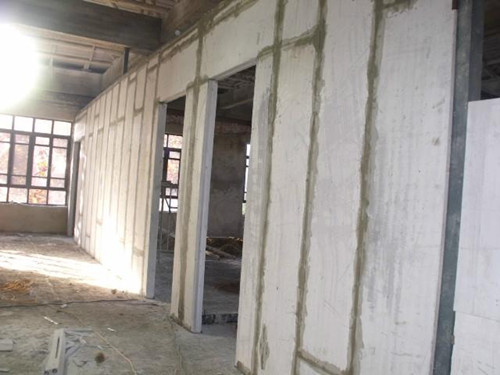
Lightweight wallboard installation process
1, put line, lift plate
In the installation position of the wallboard, the elastic baseline is perpendicular to the floor of the floor or the bottom of the beam to ensure the flatness and verticality of the installed wallboard, and the position of the door hole is identified; after the wallboard has entered the construction site, the person or machine is used according to the thickness of the slab. Lift the board to the wall plate mounting area.
2, saw
The entire panel wall is 610mm in width and 2440 or 3000 in length. When the width and height of the wall end are less than one full plate, the patch plate should be used, and the width or height of the required patch plate can be arbitrarily cut by a hand-held machine, so that the loss rate of the wall plate can be reduced.
3, sizing
The slurry is spliced ​​with professional caulking material, and then the dust on the surface of the wall board concave-convex groove is wiped with a damp cloth, and the brush is moistened with water, and then the professional caulking polymer mortar is applied to the wall grooves and the floor baseline.
4, loading plate
After the wall board with good slurry is moved to the position where it is to be assembled, use a shovel to pry the wall board from the bottom and force the board tightly against the board so that the mortar polymer will be extruded from the joint and then scraped off. The slurry that protrudes from the wallboard surface must ensure that the joint between the board and the board is full. Finally, it is temporarily fixed with a wooden wedge.
5, proofreading
After the initial assembly of the wallboard, use a professional shovel to adjust the adjustment, use 2M straight ruler to check the flatness and verticality.
6, fixed
After the wallboard is calibrated, the wallboard is temporarily fixed with a wooden wedge. In addition to the adhesion of polymer cement mortar to the floor (bottom and top), two adjacent wall panels, and the wall-to-bottom connection, 200 to 250 mm long φ6 or 8 steel reinforcements are also used for reinforcement treatment (rebar insertion into wall panels should be greater than 100mm). Plates over 125mm thick must be driven into 2 reinforcements.
7, pointing
After using the above joint material to install the wallboard, it is used to protrude the mortar of the wallboard surface joint, and check the seam joint, which is generally lower than the board surface 4~5mm. This step is to do the joint processing of the wallboard. considerate.
8, buried line tube
When the line pipe and the switch socket box are embedded in the wallboard, the installation hydropower unit draws all the positions of the various types of line pipe troughs, boxes and boxes for the strong and weak electricity and water supply and drainage on the wallboard in accordance with the design requirements. Do not open holes on both sides of the same location at the same time, and do it after the wall has been maintained for a minimum of three days. If the same position on both sides of the wall is covered with a cable pipe, box or switch box at the same time, it should be staggered more than 100mm in the horizontal direction or in the height direction to avoid reducing the sound insulation performance of the wall. When grooving, you should first bounce the size and width of the groove, cut the frame with a (small) hand-held cutting machine, and then lightly chisel it with artificial light. It is forbidden to open the hole with violence. The general depth of gouge should not be greater than 2/3 of the wall thickness, and the width should not be greater than 400mm. The method and method for laying the line pipe should be carried out according to the relevant requirements. The horizontal direction of the line pipe should not exceed 350mm. After the line pipe is laid well, the polymer cement mortar is used for layered backfill treatment according to the method of plate seam treatment.
9, install the door frame, door cover
The wallboard can meet the requirements of installing door frames and door pockets, such as wooden doors, glass spring doors, fire doors, etc. For details, please contact our technical department to obtain a plan.
10, grouting
Seven days after the wallboard installation process was completed, the maintenance of the wall was started by filling the upper and lower seams with the joint between the board and the board with a special polymer slurry, and the original wedge was pulled out and filled with the mortar.
Editor's summary: The above is about some specific processes of lightweight wallboard installation. In fact, in the process of lightweight wallboard installation, the most important thing is that we need to carefully complete each step of the process, and we also do not forget to check afterwards. Guarantee the quality pass. We only have such a mentality. Then the house we should come out from is beautiful and reliable.
Wallboard Construction Install Yourself Renovation House Process Heating Installation Loading Process Lightweight Panel Installation
Outdoor LED lights have revolutionized the way we light up our homes and outdoor spaces. From the chic Outdoor Wall Sconce to the sturdy Porch Light Fixtures, LED lights offer not just style but also energy-efficiency and durability. Outdoor Landscape Lighting can be used to enhance the beauty of gardens, walkways, and other outdoor areas. Battery Powered Outdoor Lights, on the other hand, provide flexibility and convenience, enabling homeowners to light up areas without the need for electrical wiring. Overall, Outdoor LED Lights are a bright and positive addition to any home, providing safety, security, and beauty to outdoor spaces!
Outdoor Wall Sconce ,Porch Light Fixtures ,Outdoor Landscape Lightin ,Battery Powered Outdoor Lights,Outdoor Led
Ningbo Le Monde Lighting Co.,Ltd , https://www.lemondelighting.com